Articles by "Pc Trick"

  PPSSPP For Windows Free Download

PPSSPP 1.0.1 Free Download
PPSSPP Emulator For PC - Hi Friends, I Going To Share This PPSSPP Emulator. You Know Playstation Series is Very Popular And PSP Portable Device You Can Play Anywhere. PPSSPP -[ PSP emulator] is Thousands Of Gamers all over the world would be thankful to Get it.
PPSSPP is the first PSP emulator for Android (and other mobile platforms), and also runs faster than any other on Windows, Linux and Mac OS X. PPSSPP is in its early stages and game compatibility is thus still somewhat spotty.
PPSSPP -[ PSP emulator Are Available 32 Bit And also 64 Bit For Windows Os. PPSSPP - [ PSP emulator Application Are Available And Also Single Link That Easily Download (Third Party Website). Enjoy!
PPSSPP Overview ( Based On ppsspp.org Site)
  • PPSSPP can run your PSP games on your PC in full HD resolution, and play them on Android too. It can even upscale textures that would otherwise be too blurry as they were made for the small screen of the original PSP.
  • Even on modern Android phones and tablets, you can often run at double the original resolution.
Enhance your experience!
  • Play in HD resolutions and more.
  • Play on a tablet for big-screen mobile gaming.
  • Customize on-screen touch controls or use an external controller or keyboard.
  • Save and restore game state anywhere, anytime.
  • Crank up the anisotropic filtering and texture scaling.
  • Continue where you left off by transferring saves from your real PSP.

   What's New? "PPSSPP"

  • - Support D3D11 (performs better than OpenGL or D3D9 on most hardware)
  • - Audio quality improvement (linear interpolation)
  • - Hardware spline/bezier tesselation in OpenGL, D3D11 and Vulkan (...)
  • - Post-processing shaders in D3D11
  • - Prescale UV setting removed, now the default (improves perf)
  • - High DPI display fixes
  • - Various fixes for UMD switching for multi-UMD games
  • - New audio setting to improve compatibility with Bluetooth headsets
  • - Various desktop gamepad compatibility fixes
  • - Workaround for mipmap issue, fixing fonts in Tactics Ogre Japanese
  • - Assorted minor compatibility fixes, code cleanup and performance improvements
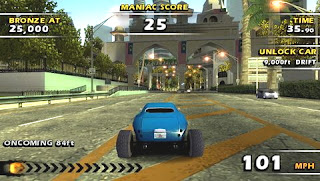
Screenshot - PPSSPP Emulator
Facebook Lite 1.10.0.50.115 Apk

    Specification On "PPSSPP"

  • Title :- PPSSPP v1.4
  • File size :- 19.29 MB
  • Requirements Os :- [ Windows (All Versions) ]
  • Languages Support :- Multiple languages.
  • License :- Open Source.
  • Date added :- ( Released :- "April 01, 2017" )
  • Author :- Henrik RydgÃ¥rd "www.millionthline.com"

Download Link Below - Server Available

PPSSPP ZIP
19.29 MB
Download

How To Boost Download Speed in IDM Optimizer

Increase Download Speed in IDM | IDM Optimizer 2017

IDM Optimizer 2017 - Hello Friends I Going To Share How To Increase IDM Speed For Any File Any Format. This is Interesting Topic For Computer & Laptop  User's. Internet Download Manager even as we explained is the best download manager today readily available as compared to any any other download manager similar to DAP, Ms Lightweight Download Manager, Orbit and many others. It's utilized to Download files faster consequently speeding up And increasing downloading with this particular tool is usually quiet easy & computerized.
             We all even posted a pleasant Guide with ways to "Download . torrent files Using IDM" (Internet Download Manager).
This Application is doing it will always be generates a many of registry access along with modify a Few of important registry with IDM. IDM provides the registry with interconnection speed along with max amount of interconnection which can be been recently modified by simply this IDM Optimizer software Application. This particular will help to improve download speed with IDM.
you are tired to search : idm optimizer, idm optimizer 2017, free download idm optimizer full version, idm optimizer download, idm optimizer free download, how to use idm optimizer, idm optimizer 2016, how to increase idm download speed, idm optimizer onhax, download idm optimizer, how to make idm download faster,h ow to make idm faster, how to speed up idm download speed, how to use idm forever, how to get idm full version, idm optimizer tool filehippo.

    My personal Knowledge - IDM Optimizer Software

  • That software program ("IDM Optimizer") is used by myself as well as We've in no way experienced almost any crashes issue & Any problem. We've likewise observed minor improve within installing speed within IDM. This specific Program is most effective within multi-downloading. I bought considerably increments within installing after i download many File at the periods. I'm able to say my IDM Download speed had been improve & Boostup by 20%.

Related Post - IDM Topic

     Step To Follow - Accelerate IDM Downloads using IDM Optimizer

  • Download IDM Optimizer Tool.
  • Then make sure IDM is installed on your PC, as this tool will only optimize IDM if its physically present on your system.
Increase Download Speed in IDM | IDM Optimizer Screenshot

  • Now just fire up your IDM Optimizer and than you will see window like above just click on "Maximize Button Now" and you will get a note asking you to restart your IDM do that and once restart your PC.
Increase Download Speed in IDM | IDM Optimizer Screenshot
  • That’s it now your IDM is Increased with speed, try to download any file & data and check out if speeds are good or not.
  • If you want to restore your default settings than you can click on Restore Default.
   Download Link Below - IDM Optimizer 2017
IDM Optimizer
306 KB
1 Mirror
IDM Optimizer
306 KB
2 Mirror
IDM Optimizer
306 KB
3 Mirror
Take Note This - "If you find any kind of error & mistake in IDM or you faced IDM Crashing then"
  • Open IDM optimizer.
  • Click on restore default option. ("This option will reset the registry setting of IDM. Now restart your IDM and now it is as it was before").
At this point it’s your turn to use this "IDM Optimizer" in addition to "increase Download Speed". If you Found any kind of issues or face any error & mistake, Below comment here. We will Help you at our best.

      PPSSPP For Windows Free Download

    PPSSPP 1.0.1 Free Download
    PPSSPP Emulator For Pc - Hi Friends, I Going To Share This PPSSPP Emulator. You Know Playstation Series is Very Popular And PSP Portable Device You Can Play Anywhere. PPSSPP -[ PSP emulator] is Thousands Of Gamers all over the world would be thankful to Get it. PPSSPP -[ PSP emulator Are Available 32 Bit And also 64 Bit For Windows Os. PPSSPP -[ PSP emulator Application Are Available And Also Single Link That Easily Download & Uploaded Userscloud (Third Party Website) . Enjoy!
    PPSSPP Overview ( Based On ppsspp.org Site)
    • PPSSPP can run your PSP games on your PC in full HD resolution, and play them on Android too. It can even upscale textures that would otherwise be too blurry as they were made for the small screen of the original PSP.
    • Even on modern Android phones and tablets, you can often run at double the original resolution.
    Enhance your experience!
    • Play in HD resolutions and more.
    • Play on a tablet for big-screen mobile gaming.
    • Customize on-screen touch controls or use an external controller or keyboard.
    • Save and restore game state anywhere, anytime.
    • Crank up the anisotropic filtering and texture scaling.
    • Continue where you left off by transferring saves from your real PSP.

       What's New? "PPSSPP"

    • Fix JIT problems on Galaxy S7 and iOS 9+ devices
    • Fix Android TV support (x86-64) and use latest FFmpeg, fix Raspberry memory use
    • Texture replacement support - for custom textures and upscaling
    • Workaround rendering issues on Tegra K1/X1
    • Initial Vulkan support on Windows - not full featured yet
    • Experimental new CPU backend and CPU fixes
    • Fix type D cheat codes, allow for homebrew
    • Fix some problems when switching away from and back to the app
    • Initial game video recording / TAS features (frame stepping)
    Screenshot on "PPSSPP Emulator":-
    Facebook Lite 1.10.0.50.115 Apk

        Specification On "PPSSPP"

    • Title :- PPSSPP v1.3
    • File size :- ( "15.7 MB")
    • Requirements Os :- [ Windows (All Versions) ]
    • Languages Support :- Multiple languages.
    • License :- Open Source.
    • Date added :- ( Released :- "September 20, 2015" )
    • Author :- Henrik RydgÃ¥rd "www.millionthline.com"

    Download Link Below - Two Server Available

    PPSSPP ZIP
    15.7 MB
    1 Mirror
    PPSSPP Zip
    15.7 MB
    2 Mirror

    Emulator PS3 [Playstation 3] For PC + Bios Plugin

     [Playstation 3]
    [Playstation 3] For PC + Bios Plugin Free Download - PSeMu3 1.3.3.9 is usually Playstation 3 emulator by playstation3emulator.net. The 1st along with ideal emulator for Sony PLAYSTATION 3 !!! They will started creating Two years ago and so are still active along with upgrading! In case your searching for a PLAYSTATION 3 emulator this is the better you can find available.
    you are tired To searching like: download ps3 bios zip, ps3 bios download no survey, ps3 emulator, ps3 bios download for pc, ps3 bios download without survey, ps3 bios download free, ps3 emulator 1.9.6 bios download ps3 bios rar, download ps3 bios zip, ps3 emulator 1.9.6 bios download, download, ps3 emulator for pc with bios and plugins, ps3 emulator 1.9.6 download ps3, emulator 1.9.6 latest bios, ps3 emulator 1.9.4 download, psemu3 download download, ps3 bios files download ps3 bios rar, psemu3 fake, psemu3 download, psemu3 bios, psemu3 review, psemu3 bios file free download, psemu3 bios installer, psemu3 emulator, psemu3 crack etc...

    Net play :

    Sony Playstation making use of Microsoft company are live network for you to enjoy having people online, all of us can't do that considered PC’s but we are able enable you to to fake the network and also enjoy considered lan(hamachi) and also enjoy with all your close friends. This really is still earlier beta and also push chair !!!

    Requirement Systems :

    • Opareting System :- Windows XP, Vista, 7 and 8
    • CPU :- Core 2 Duo E6850 3.0GHz or better.
    • RAM :- 2GB or more.

    How To Run :

    • Download and extract PlayStation 3 emulator.
    • Download Bios and place it in the same folder with the emulator in the extract
    • If the emulator can not be opened Download .Net Framework, 
    • Then restart On Your PC..
    • Working Perfectly 
    • And Enjoy It…

    New Update 1.3.3.9 | Cryptox | 4 lines

    • Improved fps for higher resolutions.
    • Some fixups.
    • Now supports more games[ Roms ].
    • Automatically locates BIOS files.

    Screenshot :


    PSeMu3, Emulator PS3 [Playstation 3] For PC + Bios Plugin Free Download

    PSeMu3, Emulator PS3 [Playstation 3] For PC + Bios Plugin Free Download

    Download Here :

    PS3 Emulator
    6.8 MB
    Get Download
    PSeMu3 Setup
    4.66 MB
    Free Download
    Ps3 Bios
    11.80 MB
    Zip File
    2nd Mirror
    11.80 MB
    Bios Zip
    dotNetFx40
    28.82 MB
    .NetFramework

      PPSSPP For Windows Free Download

    PPSSPP 1.0.1 Free Download
    PPSSPP Emulator For Pc :- Hi Friends, I Going To Share This PPSSPP Emulator. You Know Playstation Series is Very Popular And PSP Portable Device You Can Play Anywhere. PPSSPP -[ PSP emulator] is Thousands Of Gamers all over the world would be thankful to Get it. PPSSPP -[ PSP emulator Are Available 32 Bit And also 64 Bit For Windows Os. PPSSPP -[ PSP emulator Application Are Available And Also Single Link That Easily Download & Uploaded Userscloud (Third Party Website) . Enjoy!
    PPSSPP Overview ( Based On ppsspp.org Site)
    • PPSSPP can run your PSP games on your PC in full HD resolution, and play them on Android too. It can even upscale textures that would otherwise be too blurry as they were made for the small screen of the original PSP.
    • Even on modern Android phones and tablets, you can often run at double the original resolution.
    Enhance your experience!
    • Play in HD resolutions and more.
    • Play on a tablet for big-screen mobile gaming.
    • Customize on-screen touch controls or use an external controller or keyboard.
    • Save and restore game state anywhere, anytime.
    • Crank up the anisotropic filtering and texture scaling.
    • Continue where you left off by transferring saves from your real PSP.

       What's New? "PPSSPP"

    • Bugfixes like the save state scroll issue, cosmetic issues like overscroll.
    • Some cheat code bugfixes.
    • Adler32 and Mersenne Twister modules added (fixes some obscure games).
    • Fix for Jak & Daxter slowdown.
    • Graphics hack for Phantasy Star Portable 2 for Direct3D9.
    • Fix compatibility with some PowerVR devices broken since v0.9.5-959-g4998044.
    Screenshot on "PPSSPP Emulator":-
    Facebook Lite 1.10.0.50.115 Apk

        Specification On "PPSSPP"

    • Title :- PPSSPP v1.0.1
    • File size :- ( "13.8 MB")
    • Requirements Os :- [ Windows (All Versions) ]
    • Languages Support :- Multiple languages.
    • License :- Open Source.
    • Date added :- ( Released :- "June 11, 2015" )
    • Author :- Henrik RydgÃ¥rd "www.millionthline.com"

    Download Here "PPSSPP Emulator"

    Download PPSSPP v1.0.1 Below Link
    PPSSPP.Exe
    13.8 MB
    Free Download

      Create Nameless Folder in Computer

    How To Make a Nameless Folder For Any Windows
    [Topic] Make a Nameless Folder :- Hello Friends, I Going To Share Tip On Create Nameless Folder For (Windows Xp/Vista/8/8.1/10 Also). You have tried using to create a folder without having name most of you'll have tried using this  tricks just before everyone but most of our friend Have not tried this trick. So I'm sharing this trick to you so that you can Make a folder without having any name Surprised but this is true You'll be able to fool your Friends using this Trick by Easily creating a nameless folder.

      Step To Follow On "Make Nameless Folder"

    1. Right click on the desktop or within any directory.
    2. From the context menu choose "New" then click on "folder" or,
    3. Right click on any folder you want and choose "Rename".
    4. With the name field for the folder still highlighted, press delete.
    5. Press and hold the "Alt" key and type the numerals "0160".
    6. Release the "alt key" and press the "enter key".
    7. Kick back & enjoy the cleanliness of your new nameless folder.

      How to Add Gadgets Back to Windows 8/8.1/10...

    Add Gadget On Windows [Guide] :- Hi Guys, I Going To Share How To Add Gadgets For Windows. You Know Windows 8/8.1 And Also Windows 10 Very Popular Operating Systems. Many People Are Miss The Gadgets from Windows 7 now that you’re using Windows 8/8.1/10? There’s no official way to re-install them, but there is a way to get them back using a third-party, free utility called Desktop Gadgets v2.0
                          But a lot of people have been missing them. If you can’t live without desktop gadgets, there is good news for you: desktop gadgets and sidebar are available for Windows 8/8.1/10!

      Step To How to Add Gadgets :

    1. Download The Installer From Below.
    2. Follow the installer wizard.
    3. Wait for the installer to finish 
    4. After Then “Right click on the desktop after that. You will see the familiar Gadgets item in your desktop context menu. 
    5. That's It. Enjoy !!!

        Sreenshot on "Add Gadgets For Windows"

      Add Gadgets For Windows 8/8.1/10
      Add Gadgets For Windows 8/8.1/10 Free

      Download Here “Gadgets For Windows 8/8.1/10”

      Desktop Gadget 2.0
      4.8 MB
      Free Download

      Hide On Recycle Bin Icon Windows 7, 8, 8.1 or 10 | Full Guide

      Pc Tips And Trick [ Hide Recycle Bin Topic ] :- Hello Reader's, Today we are going to tell Hide Recycle Bin Icon For Windows 7,8 Or 10. This Topic Very Interesting On Windows User's. Many people who are in the recycle bin is your secret files and they do not want any person to delete the file and open And many people do not like to see on the desktop Recycle Bin icon Or also may cause for those people that we are Guide. Now come on topic The only real issue Or difficulty will be that each New Version windows makes it take more steps to get rid of it, and also windows 10 will be even more complicated than the rest. Here’s the best way to hide it in any version of Windows.

          Step By Step Follow ( Deleting the Recycle Bin Icon in Windows 8, 10 )

      • Sadly Windows 10 makes getting rid of that Recycle Bin a lot more confusing for the average user - the truth is, they’ve changed the location with the Screen completely. Fortunately we’ve decided that away available for you.
      1. Click The Right Button on the desktop and choose Personalize. [ Windows 8.1 | Windows 10 Below Picture]
      2. Choose Personalize [ Windows 8.1]
        Choose Personalize [ Windows 8.1]
        Choose Personalize [ Windows 10 ]
        Choose Personalize [ Windows 10 ]
      3. Now select Themes on the left-Side Menu, and then once you are there, you can select Desktop icon settings under the Related Settings section [ Windows 10 Option ] | left-Side Showing You Change Desktop Icons Option Click Now [ Windows 8.1 Option ]
      4. ScreenShot [ Windows 10 ]
        Screenshot [ Windows 8.1 ]
      5. And also you can un-check the box for Recycle Bin and then click Apply at the bottom of the window to finally hide that Recycle Bin icon. [ Windows 8.1 | Windows 10 Below Picture]
      6. Uncheck the box for Recycle Bin [ Windows 8.1 ]
        Uncheck the box for Recycle Bin [ Windows 8.1 ]
      7. That's It.

          Step By Step Follow ( Hide the Recycle Bin Icon in Windows 7 )

      1. Right-click on the desktop, choose Personalize, then choose Desktop Icon settings on the left-hand side.
      2. How to Hide or Remove on Recycle Bin Icon in Windows 7
        Windows 7 Screen Shot Is It
      3. After Then simply remove the check from the box :
      4. Remove on Recycle Bin Icon in Windows 7
        Windows 7 Screen Shot Is It
      5. Apply & Ok.
      6. That's It.
      • Take Note that you can also configure this from the Desktop Icon Settings in Personalization.

      Disable/Turn Off Notification Sounds in Windows 10

      How to Disable/Turn Off Notification Sounds in Windows 10
      Topic On Disable/Turn Off Notification Sounds :- Hi Friends, This Topic Very Interesting On Windows 10 User's. And This Article Help To Disable Or Turn Off Notification Sound Tips For Windows 10 Only. Disabling notification sounds for app notifications is fairly an easy and uncomplicated task. A Tiny searching in the System Settings, several clicks will be just about all that’s Needed. So, Today we all may show you the way to Disable Or Turn Off Notification Sounds.
                            Windows 10 is usually getting the main notification System and further expanding the it, adding a dedicated panel that slides out of the right screen side. It is used to listing older notifications you've missed while you’re from this laptop or computer.
      DropBox Notification For Windows 10 ScreenShot
                           Toast notifications now slide out along the bottom, which can be annoying whenever files are added to your Dropbox or a Above screenshot is taken or you plug in a removable storage device.
      Here’s a quick manual to be able to changing Microsoft windows 10’s notification behaviour including muting sounds.

        Step To Follow Manual Notification Settings:-

      1. Now, To access the settings to turn off notifications, click on the notifications icon in the taskbar’s System tray place, and then click “All settings”.
      2. Right Side Corner For Windows 10 ScreenShot
        The taskbar’s new notification icon in Windows 10 (left of the keyboard icon) will display recent notifications and quick access to important settings.
      3. The particular New-look Settings are slowly replacing the Old Control panel example that has inhabited Microsoft windows produces since the 90s. On the main Setting display, you need to click the “System” Option.
      4. Windows 10 Control Panel ScreenShot
      5. Click on the “Notifications & actions” Class. Underneath the “Notifications” Area, there is a control to “Show software notifications”, that will turn them fully off of. Down below this particular there are Options to disable certain apps from displaying.
      6. How to Disable/Turn Off Notification Sounds in Windows 10
      7. In “Sound” click on the “Sounds” tab and you can either remove system sounds completely, or configure them individually.
      8. Sound Dialog Box To Remove System Sounds
        Longtime Windows power users will know how this works.
      9. The actual event is called “Notifications” so that is easy enough to find. When you do, click the scrolling menu at the bottom of the control panel next to the “Test” button, scroll to the top and select “None”, and click “Apply” or “OK”.
      10. Notification Option Showing You
      11. Truly, this is really Old School, and we Genuinely trust Microsoft sorts it out because it would be So much simpler just to have the turn notification sounds off in the notification settings.

      Fix System Restore Error 0x81000203

      How to Fix System Restore Error 0x81000203 : Easy Fix On Windows Os
      Fix System Restore Error 0x81000203 Easy Fix On Windows Os :-System restore is usually an essential Part of windows Os computer of which really helps to recover your system could possibly help connected with system failing as well as system deterioration and recently while trying to restore the Windows 8.1 laptop to be able to previously day out When i faced a really strange error that has been continually avoiding myself to restore the system that is quite troublesome to take care of.

      System Restore Error 0x81000203 Fixed

                                            The actual error states "There seemed to be an unexpected error from the properties page :- System Restore found a mistake. Make sure you try to run System Restore again. (0x81000203) Please close the property Page and test again" every time while trying to configure system restore settings.
      How to Fix System Restore Error 0x81000203 : Easy Fix On Windows Os
                                     In addition while trying to Open up the System Restore the System ended has been showing not any earlier recover points to restore the System to previously time date which has been actually surprising to find out since I keep generating recover Point typically being for the safer part yet this became unpleasant. The more irritating aspect has been that there was clearly simply no correct fix readily available over the web in the detailed stage guidance as well as almost all of the corrects were being such as registry modifying, steps involving third party software’s such as Antiviruses, Tuneup tools and many others and to always be honestly speaking not one of such do the Work.

                                    After The hour involving rigorous research I  finally fixed the System recover mistake Or Error "0x81000203" and as a consequence here Let me discuss about detailed guidance about how to solve process Restore recover mistake Or Error "0x81000203".

      How to Fix System Restore Error 0x81000203 Steps to Follow :

      • As stated previously mentioned you'll find lots of Fixes on the internet such as registry editing, removing connected with alternative software’s such as Antiviruses, Tuneup utilities and so etc but not one of those perform thus just stay away from these kinds of Fixes along with Steps by the actual down below presented easy Fix that will absolutely fixes the difficulty because it performed in my case.
      • Press Windows + R button to Open RUN Command box and here type services.msc as shown below and Hit Enter.
      How to Fix System Restore Error 0x81000203 : Easy Fix On Windows Os
      • Here look for "VOLUME SHADOW COPY" and make sure that it is "ENABLED" and its startup type is set to AUTOMATIC as shown below.
      How to Fix System Restore Error 0x81000203 : Easy Fix On Windows Os
      • Take Note :- To Change the startup type to AUTOMATIC Right click on VOLUME SHADOW COPY and select PROPERTIES and here you can change the startup type as shown below.
      How to Fix System Restore Error 0x81000203 : Easy Fix On Windows Os
      • the same for "MICROSOFT SOFTWARE SHADOW COPY PROVIDER" where you need to and make sure that it is "ENABLED" and its startup type is set to "AUTOMATIC".
      • That’s all you need to follow and this will surely fix your error.

      Where To Find & Change MAC Address Os X

      How to Find and Change Your MAC Address on OS X
      Finding & Change MAC Address Os X :- Hi Friends, I Am Come Back And Share You Some Tips for Mac Os X. This Tutorial For Mac User's Only. How To Where Finding & Change Your Mac Address OS X This is Interesting Topic. A MAC address is a unique identifier assigned to your network card, and some networks implement MAC address filtering as a method of security. your computer includes a built-in unique MAC (Media Access Control) Address to use identify your computer, however it's possible to change it out natively in OS X.

        > Where Finding Your MAC Address [Steps To Follow]

      • OS X provides a simple and fast solution to find the MAC Address. Simply just Hold down the Option key and click the Wi-Fi icon in the menu bar : [ Below Screenshot]
      • Find your MAC Address
      • The Address portion with all the colons is your MAC address. It is actual physical MAC address, which for Many User's is the address you want. Even so, in case your address has been changed, you can check exactly what address on your computer will be using to communicate with by firing up a Terminal and running :
      • You Want To Copy Code First Select And Press Key Ctrl + C
        ifconfig en0 | grep ether
        MAc Address Windows
      • This may output on your MAC address to the hardware user interface en0, which for some Macs is used regarding Wi-Fi. You can check which user interface is Used regarding wi-fi through holding Down the option key and pressing this Wi-Fi Icon inside the menu bar, that'll rapidly provide you with what system you happen to be using to access the Internet : Below Screenshot]

       > Where To Find & Change MAC Address Os X [Steps To Follow]

      • If you wish to change on Your MAC Address and also have a specific a single at mind, you can established this together with :
      • You Want To Copy Code First Select And Press Key Ctrl + C
        sudo ifconfig en0 ether aa:bb:cc:dd:ee:ff
      • This will set your MAC address for en0. If you have a Mac that also has an Ethernet port, you may need to use en1.
      • Take Note :- Understand that after you edit your MAC address possibly you have network problems, then it is advisable to restart Your Wi-Fi after changing it.

      Remove Sponsored Ads from uTorrent

      How to Remove Sponsored Ads from uTorrent Latest Update
      uTorrent has Currently released sponsored ads [advertisements] coming from version 3 regarding it's Torrent programs. What exactly many people don't get will be these adverts are optional and will be disabled inside preferences, and so simply just Steps to these types of steps and will also be able to benefit from the most up-to-date version regarding uTorrent, without having those adverts! This technique may also help BitTorrent customers Or Users..

      Steps To Follow :-

      •  Open the "uTorrent" application.
      How to Remove Sponsored Ads from uTorrent Latest Update
      • Click "Options" and then select "Preferences" from the menu bar at the top of the page.
      How to Remove Sponsored Ads from uTorrent
      • Select the "Advanced" option from the list on the left hand side of the preferences window.
      How to Remove Sponsored Ads from uTorrent Latest Update
      • You will see a box with a long list of advanced options in the center of the window, from this list, scroll down and click to highlight Color "gui.show_plus_upsell" - or use the filter function to find it.
      How to Remove Sponsored Ads from uTorrent Latest Update
      • Below the box, there is an option to change the value to either "True" or "False". Select the "False" value. [ This option disables the square ad in the bottom left corner of the application.]
      How to Remove Sponsored Ads from uTorrent Latest Update
      • Scroll down the list even further, and click to highlight Color "offers.sponsored_torrent_offer_enabled" and again, select the "False" value below the box. [ This option disables the banner ad which appears at the top of your torrent list.]
      How to Remove Sponsored Ads from uTorrent Latest Update
      • Similarly set to "false" the following options [ or check that they are set to false ]. "offers.left_rail_offer_enabled", "offers.sponsored_torrent_offer_enabled", "gui.show_notorrents_node", "offers.content_offer_autoexec" & "bt.enable_pulse".
      How to Remove Sponsored Ads from uTorrent Latest Update
      • Click "OK" and then exit the uTorrent application from the File menu, or right-click the uTorrent logo in the tray and select "Exit", to close it fully.
      How to Remove Sponsored Ads from uTorrent Latest Update
      • Open the uTorrent application and enjoy using uTorrent without those annoying ads!
      • It's Perform And Enjoy...

      Contact Form

      Name

      Email *

      Message *

      Powered by Blogger.
      Javascript DisablePlease Enable Javascript To See All Widget