
Free in app purchases android No Root Required [creehack]
![Free in app purchases android No Root Required [creehack]](https://blogger.googleusercontent.com/img/b/R29vZ2xl/AVvXsEijdBSnbpk2mu8r7qG3YYqfSjsqaezLS5ZYxQ7X7BJw19QcpaHArVxT9DKiFtf5qPaUFXSziyWANDHBRUT1TJoNow49oIlEtBCuAW5a0AviwT85BVH1OddwvwkMiIMcw32L7HkEPf4D9iyh/s1600/Free+in+app+purchases+android+No+Root+Required+%255Bcreehack%255D.png "Free in app purchases android No Root Required [creehack]")
You are tired to find like - creehack apk no root, creehack, creehack app, free in app purchases android, free in app purchases android no root, in app purchase hack android no root, in app purchase hack, how to get free in app purchases android, free in app purchases, in app purchase hack android, tapjoy hack, google play store money hack, how to hack apk games without root, free google play credit hack, free in app purchases android no root, in app purchase hack android online games, free in app purchases android no root 2017, in app purchase hack ios, in app purchase hack paypal, free in app purchases no jailbreak, in app purchase hack android clash of clans, in app purchase hack android xda etc...
Disclaimer: Well this is illegal to hack in app purchase because app developer do lot of efforts and spend lot of time to develop a single app and that app is the only way of their earning. This guide is only for educational purposes and we don’t support piracy by any way. We recommend our readers to buy games and apps rather cracking and hacking them. Developers should get reward to their hard work.
Here we acquire the In-App purchase hack/bypass application: CreeHack to get free unlimited in-app purchases on android and also make trial version apps to full version. Utilizing this application, you will have the capacity to buy all Coins, Gems, Levels and Lives for totally free!! It contains an inbuilt free card, which can be use on Google Play! This is superior to Freedom APK, which requires root.
Remember - This CreeHack app does not root required it work fine without root devices. this is one of the major advantage of using CreeHack over Freedom.
💪 Best features of CreeHack:
- Unlimited In-App Purchases.
- Bypass any App Payments.
- Works with all apps even those which are not supported by freedom.
- More devices added.
- No Root Required also.
CreeHack App - 😖 How to Use ?

- Above giving images can help you how to do. if you don't understand then follow below information.
- Install the app, Tap on Enable, and forget it!
- Open any App which requires In-App Purchase
- Tap on the Pay option and the Google Play Payment Box appears
- Just click the Pay and Boom! Payment Successful 😉
- Enjoy the Hack!


![First Tips On Blog [ Passion ]](https://blogger.googleusercontent.com/img/b/R29vZ2xl/AVvXsEgGOYlPh-VzxHvym3gJxKYt0eWWZwtMQGw2WUKt-utMckWeV902n4t4DoksvhXkvuSq_UreIcoS4E2m8h5JQGaJ_sOyy4ObQRj7sqO2Q2o7zrBWOkUFJAdTCW1r5GQhFuIJk-Bb6e20PDlI/s400/Tips+%2526+Good+Advice+By+Nbb+.png "First Tips On Blog [ Passion ]")


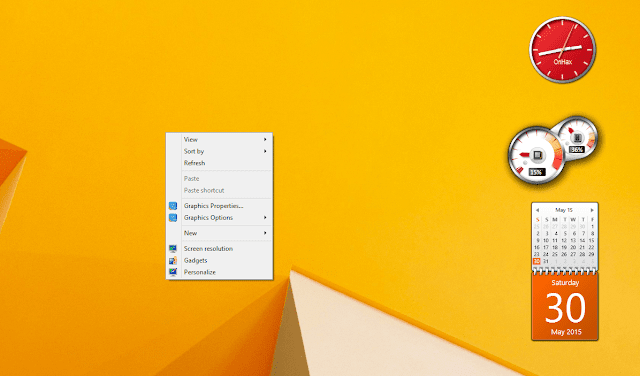


![Choose Personalize [ Windows 8.1]](https://blogger.googleusercontent.com/img/b/R29vZ2xl/AVvXsEgOBSrQtCpT210NcxHBC0Axcea0M249gC505Hh5tjCJCyHwuYeRt-WrNUu7vN3jlPxEkM5Yrxw49is9wW_mhvi3de61nJLKBL9CZvAaPwNiWxYbrCE3I0AFqO4T106eQx_pweewU7QPNgaE/s640/choose+Personalize+Windows+8.1.jpg "Choose Personalize [ Windows 8.1]")
![Choose Personalize [ Windows 10 ]](https://blogger.googleusercontent.com/img/b/R29vZ2xl/AVvXsEhKTYfqtWi7-QKQSQxZDzHHuBulzPVCoMJ3bq2fhdzeWmEyTXb9I2w47zwN55VHWIMFufdEh9-P3FO9kqIHdN3KZXczaSxqDKx3DvmMG3G6SbgJECXQuANJgWArtMKnBPAK9AQaXWfw4EXw/s640/choose+Personalize+Windows+10.png "Choose Personalize [ Windows 10 ]")


